Linux Kernel Development using NixOS
This is my attempt at configuring a Linux Kernel Development environment in NixOS.
Why NixOS
NixOS is a unique Linux distribution that employs the Nix package manager, which offers reproducible builds and a declarative configuration approach. This makes it an ideal choice for setting up a kernel development environment where consistency and isolation are crucial.
Basically, anyone why has worked with Ubuntu knows the pain of working with dependency, especially on systems with lots of other packages (I know I should use docker). Using NixOS, its load and unload packages is a simple configuration.nix file change, and in addition, packages are isolated (so they don’t fight with each other!).
Configuration
I’m using a x86-64 machine, I’m currently not planning on cross-compling so I’ll stick to native tools.
Since I use neovim with coc.vim language server and coc.clangd. I’m going to complie the kernel using the LLVM comiler instead of the usual gcc in order to work with coc-clangd.
I plan on running the Linux Kernel on QEMU emulator.
The Linux Kernel documentation https://docs.kernel.org/ was super helpful throughout, I highly recommend to any kernel-modders.
Steps
Before we begin, it’s always good to ensure the package manager is up-to-date:
1
2
sudo nix-channel --update
sudo nixos-rebuild switch
Setting up the Shell Env
If you would like to, you can directly add the complie tools to the configuration.nix file. However, I recommend creating a separate nix-shell environment instead.
1
2
3
4
5
6
7
8
9
10
11
12
13
14
15
16
17
18
19
20
21
22
23
24
25
with import <nixpkgs> {};
{
     testEnv = stdenv.mkDerivation {
       name = "linux-kernel-dev-env";
       buildInputs = [
           stdenv
           git
           gnumake
           ncurses
           bc
           flex
           bison
           elfutils
           openssl
           qemu_full
           debootstrap
           gcc
           gdb
           clang_16
           clang-tools_16
           lld_16
           llvmPackages_16.libllvm
       ];
     };
}
These packages include the essential compiling tools like LLVM and make, and a few helpful tools like gdb for debugging. Swap the shell environment:
1
nix-shell linux.nix
Cloning the Kernel
Next, we’ll need to configure and build the kernel. Clone the Linux kernel source code:
1
git clone git://git.kernel.org/pub/scm/linux/kernel/git/stable/linux.git
This may take some time since the whole git tree is ~ 3GB.
Making the Config
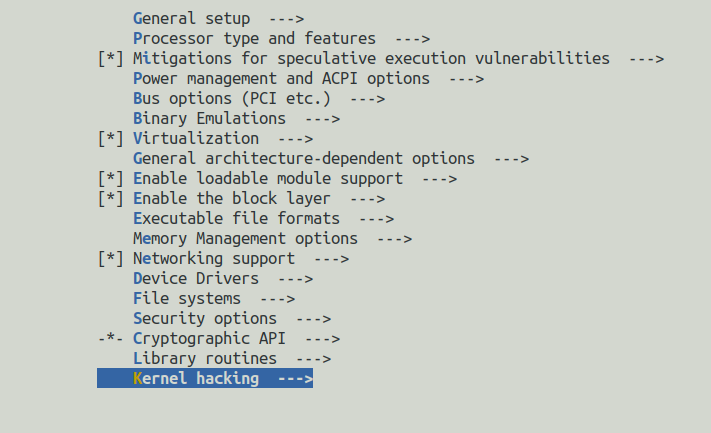
We shall use menuconfig to configure our compiler setup, run:
1
make ARCH=x86_64 LLVM=1 menuconfig
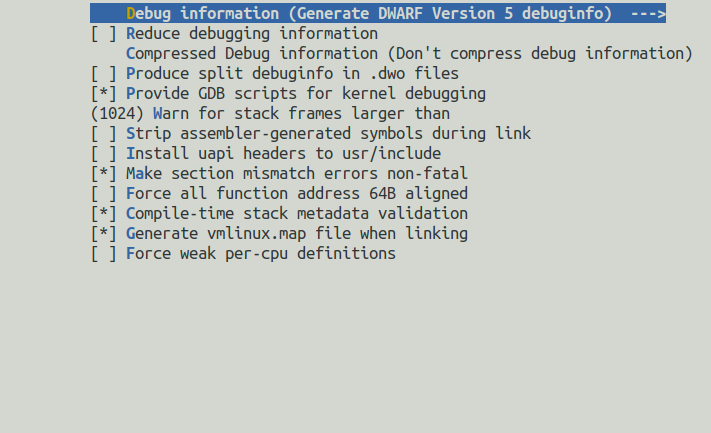
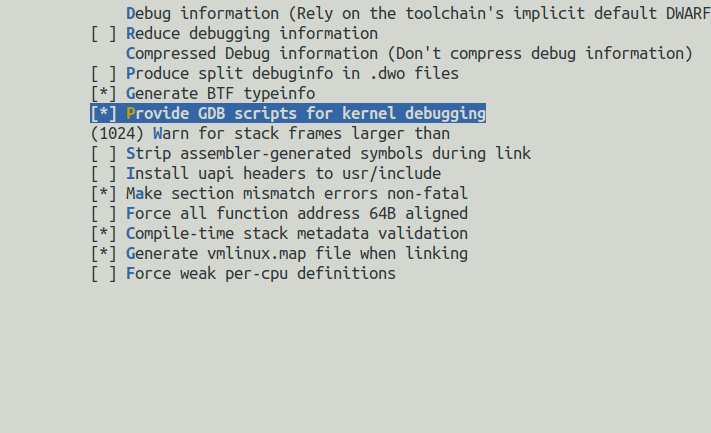
This launches a ncurses menu, check the options you would like. We shall check the ones relevant to debugging:


Compile the Kernel
Then compile the kernel,
1
make ARCH=x86_64 LLVM=1 -jN
To compile faster, make can be run with the -jN argument, where N is an integer number of parallel jobs. I usually set it to 8.
Creating the Disk Image
We shall follow the syzkaller guide to create a Debian Bullseye Linux image. To install at ./img/
1
2
3
4
5
6
export IMAGE=./img
mkdir $IMAGE
cd $IMAGE/
wget https://raw.githubusercontent.com/google/syzkaller/master/tools/create-image.sh -O create-image.sh
chmod +x create-image.sh
./create-image.sh -s 1024 -f minimal
Some Problems I Had
For me, everything except the last part of create-image.sh was successful, aka:
1
2
3
4
5
6
7
# Build a disk image
dd if=/dev/zero of=$RELEASE.img bs=1M seek=$SEEK count=1
sudo mkfs.ext4 -F $RELEASE.img
sudo mkdir -p /mnt/$DIR
sudo mount -o loop $RELEASE.img /mnt/$DIR
sudo cp -a $DIR/. /mnt/$DIR/.
sudo umount /mnt/$DIR
I had that the cp resulted in IO Error since img/chroot/proc/ img/chroot/sys/ was mounted. I basically unmounted
1
2
sudo umount img/chroot/proc/
sudo umount img/chroot/sys/
removed everything in $RELEASE.img mount:
1
sudo rm -rf /mnt/chroot/*
And recopy
1
sudo cp -a $DIR/. /mnt/$DIR/.
Run QEMU
We run:
1
2
3
4
5
6
7
8
9
qemu-system-x86_64  -kernel arch/x86_64/boot/bzImage
                    -nographic
                    -append "console=ttyS0 root=/dev/sda nokaslr"
                    -drive file=img/bullseye.img,format=raw
                    -m 2048
                    -smp 2
                    --enable-kvm
                    -cpu host
                    -gdb tcp::1234
Debugging with GDB
We run gdb:
1
gdb vmlinux
You will get a warning,
1
2
3
4
warning: File "*.py" auto-loading has been declined by your `auto-load safe-path' set to "$debugdir:$datadir/auto-load".
To enable execution of this file add
	add-auto-load-safe-path /path/to/linux/scripts/gdb/vmlinux-gdb.py
line to your configuration file "/home/<username>/.gdbinit".
simply add to .gdbinit will do. Then we rerun gdb and attach:
1
2
(gdb) target remote :1234
Remote debugging using :1234